Installation Manual | Meta Quest 3
Simulator Equipment | Meta Quest 3
Setting up the Innerspace Simulator
Quick Setup Guide | Preparing the Equipment
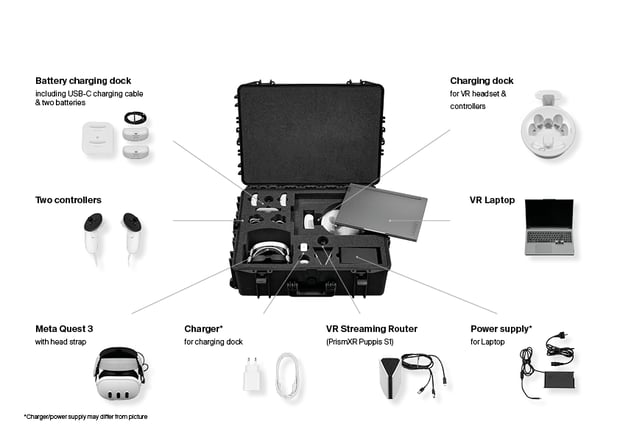
- Open the delivery box containing the laptop, take it out, and connect it with the provided
power supply to a power plug. - Open the laptop and press the power button.
- Take the VR streaming router and connect the USB-C cable to the router (ensure proper
alignment of L & R as indicated on the VR streaming router and the cable

- Plug the two USB connectors into the laptop: The USB 3.0 connector (indicated by blue)
should be connected to the USB 3.0 port on the laptop.

- Remove the battery charging dock from its box and connect it to the USB-C port on the
laptop using the provided USB-C cable. - Place the two batteries onto the charging dock.
- Take the charging dock from the box and connect it with the provided power supply cable
to a power plug. - Place the strap holder in the slot of the lower back part of the charging dock.
- Take out the two controllers and place them on the controller slots of the charging dock.
A beeping sound will confirm a successful connection and indicate that the controllers are
ready to be charged.
- Take the headset and unfold the head strap: Rotate the two arms of the Quest 3
downwards until they reach the bottom.
- Place the headset on the charging dock. If the strap is positioned high above the strap
holder, you need to manually press down the strap to ensure it is correctly placed on the
strap holder.

Note for the charging dock: LED indicators indicate if the controllers and headset are charging or
are fully charged:
- Orange: Charging
- Green: Fully Charged
Quick Setup Guide | Starting the Equipment
Starting the Workstation
- Open the laptop and press the power button (it will auto-login).
The laptop is configured using Windows Kiosk mode. This provides the user with access to
a restricted Windows desktop experience that only contains the applications that are
required for the virtual reality training experience. On the Laptop, you will be presented
with the Windows Kiosk desktop.
- Connect the laptop to the defined Wi-Fi network and ensure with your IT technicians that
the network firewall configurations are allowing communication through the defined ports
and endpoints according to the Configuration Requirement – Meta Quest 3 documentation. - Check the streaming router lights if everything is working properly: (This can take several
minutes until it reaches the desired state)- Top light: Off
- Middle light: Blue
- Bottom light: Yellow
- Note: The Middle light indicates if internet is available. In case the middle light is red the
solution still works.
Starting the Streaming Software
The next step is to start the software on the laptop.
- Open ALVR on the desktop of the laptop, which will automatically launch SteamVR.
Check if the streaming solution connection is working by:- In SteamVR, the headset icon is displayed just with borders and the controller
icons will be blinking. - On the ALVR application in the left bottom corner it is written SteamVR:
Connected.
- In SteamVR, the headset icon is displayed just with borders and the controller
Set Up the VR Headset
- Place one battery from the charging dock to the slot on the back of the headset.
- Put on the headset and grab the controllers.
- On the rear part of the headset, there is a wheel to adjust the fit of the headset to your
head.
In the headset view, you will be prompted to enter a PIN. Enter the PIN: 0000
Follow the instructions to redraw your boundaries.- Look around the room in all directions.
- Continue following the prompt.
- You may drag the boundaries with your controller to adjust them, though it is not
necessary as the room was scanned, and objects are usually detected with their
boundaries. - If prompted to upload the points to the cloud, press No.
- To check if the connection is working, you should now be in a mountain environment and see you’re the controllers in your hands moving according to your arm movements.
- To double-check, verify that on the laptop by checking if SteamVR icons are filled and
steadily lit.